
I’ve been riding and studying recumbents in all their forms intently for about 12 years now, and ideas have been slowly forming in my head regarding what they should and should not be, mostly specifically in the non-MBB short wheelbase bike category. And as I have learned more, and my opinions started solidifying, I realized that what I really wanted to ride simply didn’t exist in the current market, nor in the last 30 or 40 years of recumbent development (as best I could tell). So as a result, I decided back in February I wanted to design my own short wheel base recumbent bike.
The Zevo is the result. 90% designed by me and built from Grade 9 titanium by Carver (http://carverbikes.com/).

There were a number of design goals with this bike, and there are several unique (or at least quasi-unique) features, but at this time I am going to focus on one of them – the steering geometry. It has a very steep steering angle and a reverse rake fork. Ok, what the fudge is that all about? I was striving for stability at all speeds, but with the main target being low speed. I want to crawl up stupidly steep hills in more or less a straight line. Recumbents have a deservedly poor reputation for bad handling at low speeds, with many contraption captains making tons of steering corrections in a desperate attempt to ride straight, but failing miserably unless the grade wasn’t too steep and they could keep their speed up a bit.
I believe the main problem is that the vast majority of short wheelbase recumbent bikes use steering geometry that is essentially derived from upright bikes, and this is probably a mistake. Upright bikes have a number of different constraints related to traditional upright rider positioning, the desire to have forward stem extensions for the bike to handle well with the rider out of the saddle, clearance between the toes and the back of the front wheel, and reasonable weight distribution both seated and standing.
As a result, most short wheelbase recumbent bikes have head tube angles in the 70-72 deg. range, and fork rakes somewhere between 40 and 48mm. This usually leads to trail figures between 58 and 70 mm, and flops in the 18 to 22 mm range. Trail-to-flop ratios are usually somewhere between 3.0 to 4.0. Ok, what does all that mean? Be patient, and remember to come back to these representative numbers after reading further.
Obviously, recumbent bikes have a whole different set of constraints, and additionally have different design requirements than upright bikes, and it seems objectively dumb to just recycle head tube angles and fork rakes that upright bikes use, without considering how things perhaps should be different. The only advantage I see is so you can use stock forks. But before we consider alternative geometries, let’s review some some basic terms and variables – head tube angle (sometimes called steering angle), trail, rake (sometimes called fork offset), and flop. Please pardon my sorta crappy drawings included herein.
In the drawing immediately below, you can see how trail, rake, and head tube angle are defined. Near the bottom, you can also see how that if you turn the bars to the left or right, the effect of trail is to center the steering. Trail is the lever arm with which rolling resistance drag at the tire’s contact patch with the road is exerted through to create a steering torque that seeks to center the steering, so you can to roll straight down the road without having to constantly put lots of attention into doing so. Since riding straight is what we want to do the vast majority of the time, trail is our friend, our buddy. Note that the higher rolling resistance is, the higher the centering force of trail. You can think of trail centering as being ‘powered’ by rolling resistance.

In this first sketch above, rake is shown in it’s typical, or positive direction. But rake can be negative too, and turn the other direction, towards the back of the bike. Like this:
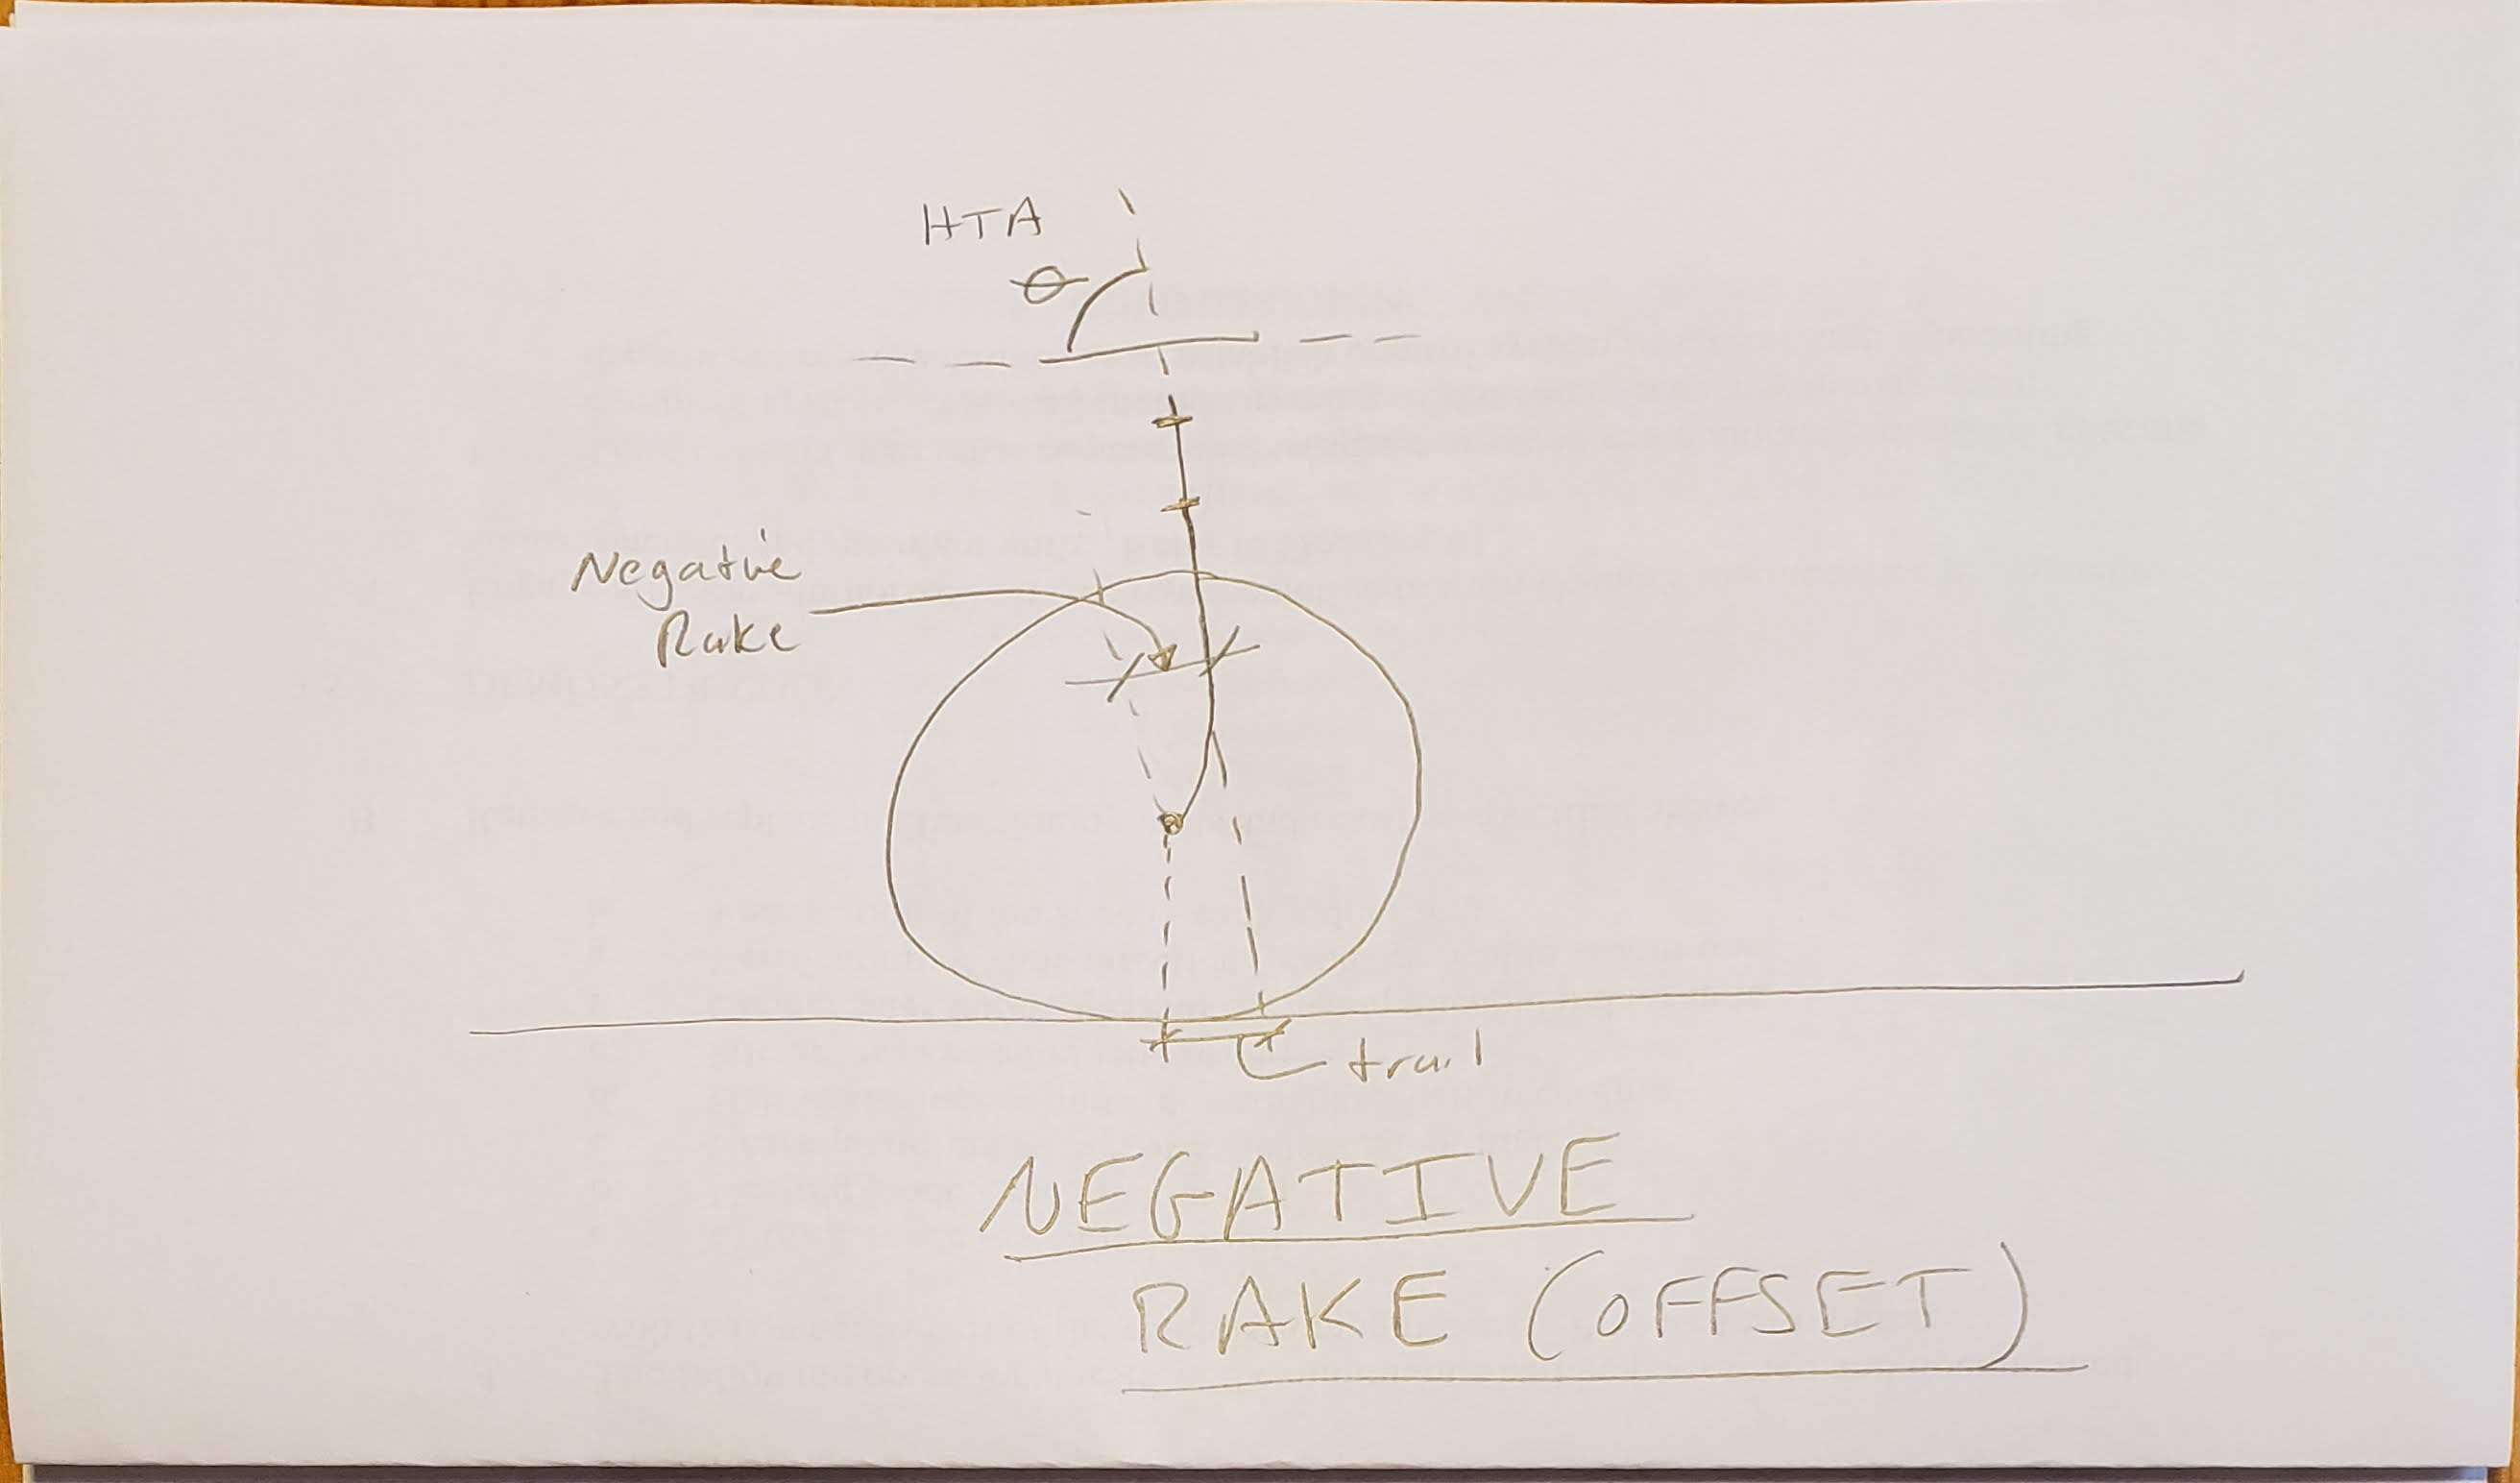
So, trail, head tube angle, and rake are as defined / shown above. But what about flop? Flop is probably the least well known of these four variables. Flop is the vertical distance the end of the fork and the front wheel axle drops when you turn the bars. It’s measurement is standardized to the drop that is produced by turning the handlebars 90 degrees. See the following diagram:

I postulate that flop is evil, and flop must be defeated.
Why is flop not a good thing, generally? Well, it is critical to understand that flop fights against the stabilizing force of trail. Trail wants to center the steering as noted above, but flop wants to do the opposite and take any small turn of the bars and turn into a bigger turn. Flop does this because Mother Earth is always trying to bring us down (literally), and flop helps gravity out by lowering the elevation of our center of mass. Flop also makes the steering torque higher because it forces you to do work to lift the front end of the bike (and rider/bike system center of mass too, of course) when you try to straighten the handlebars. This likely leads to over-correcting by most riders. Too much force leads to overshoot, so to speak. Because flop is ‘powered’ by gravity, the heavier you are, or the more forward biased the the bike’s weight distribution is, the worse flop gets. The following image is an analogy of the effect of varying degrees of flop has on the rider trying to pilot his bike in a straight line.
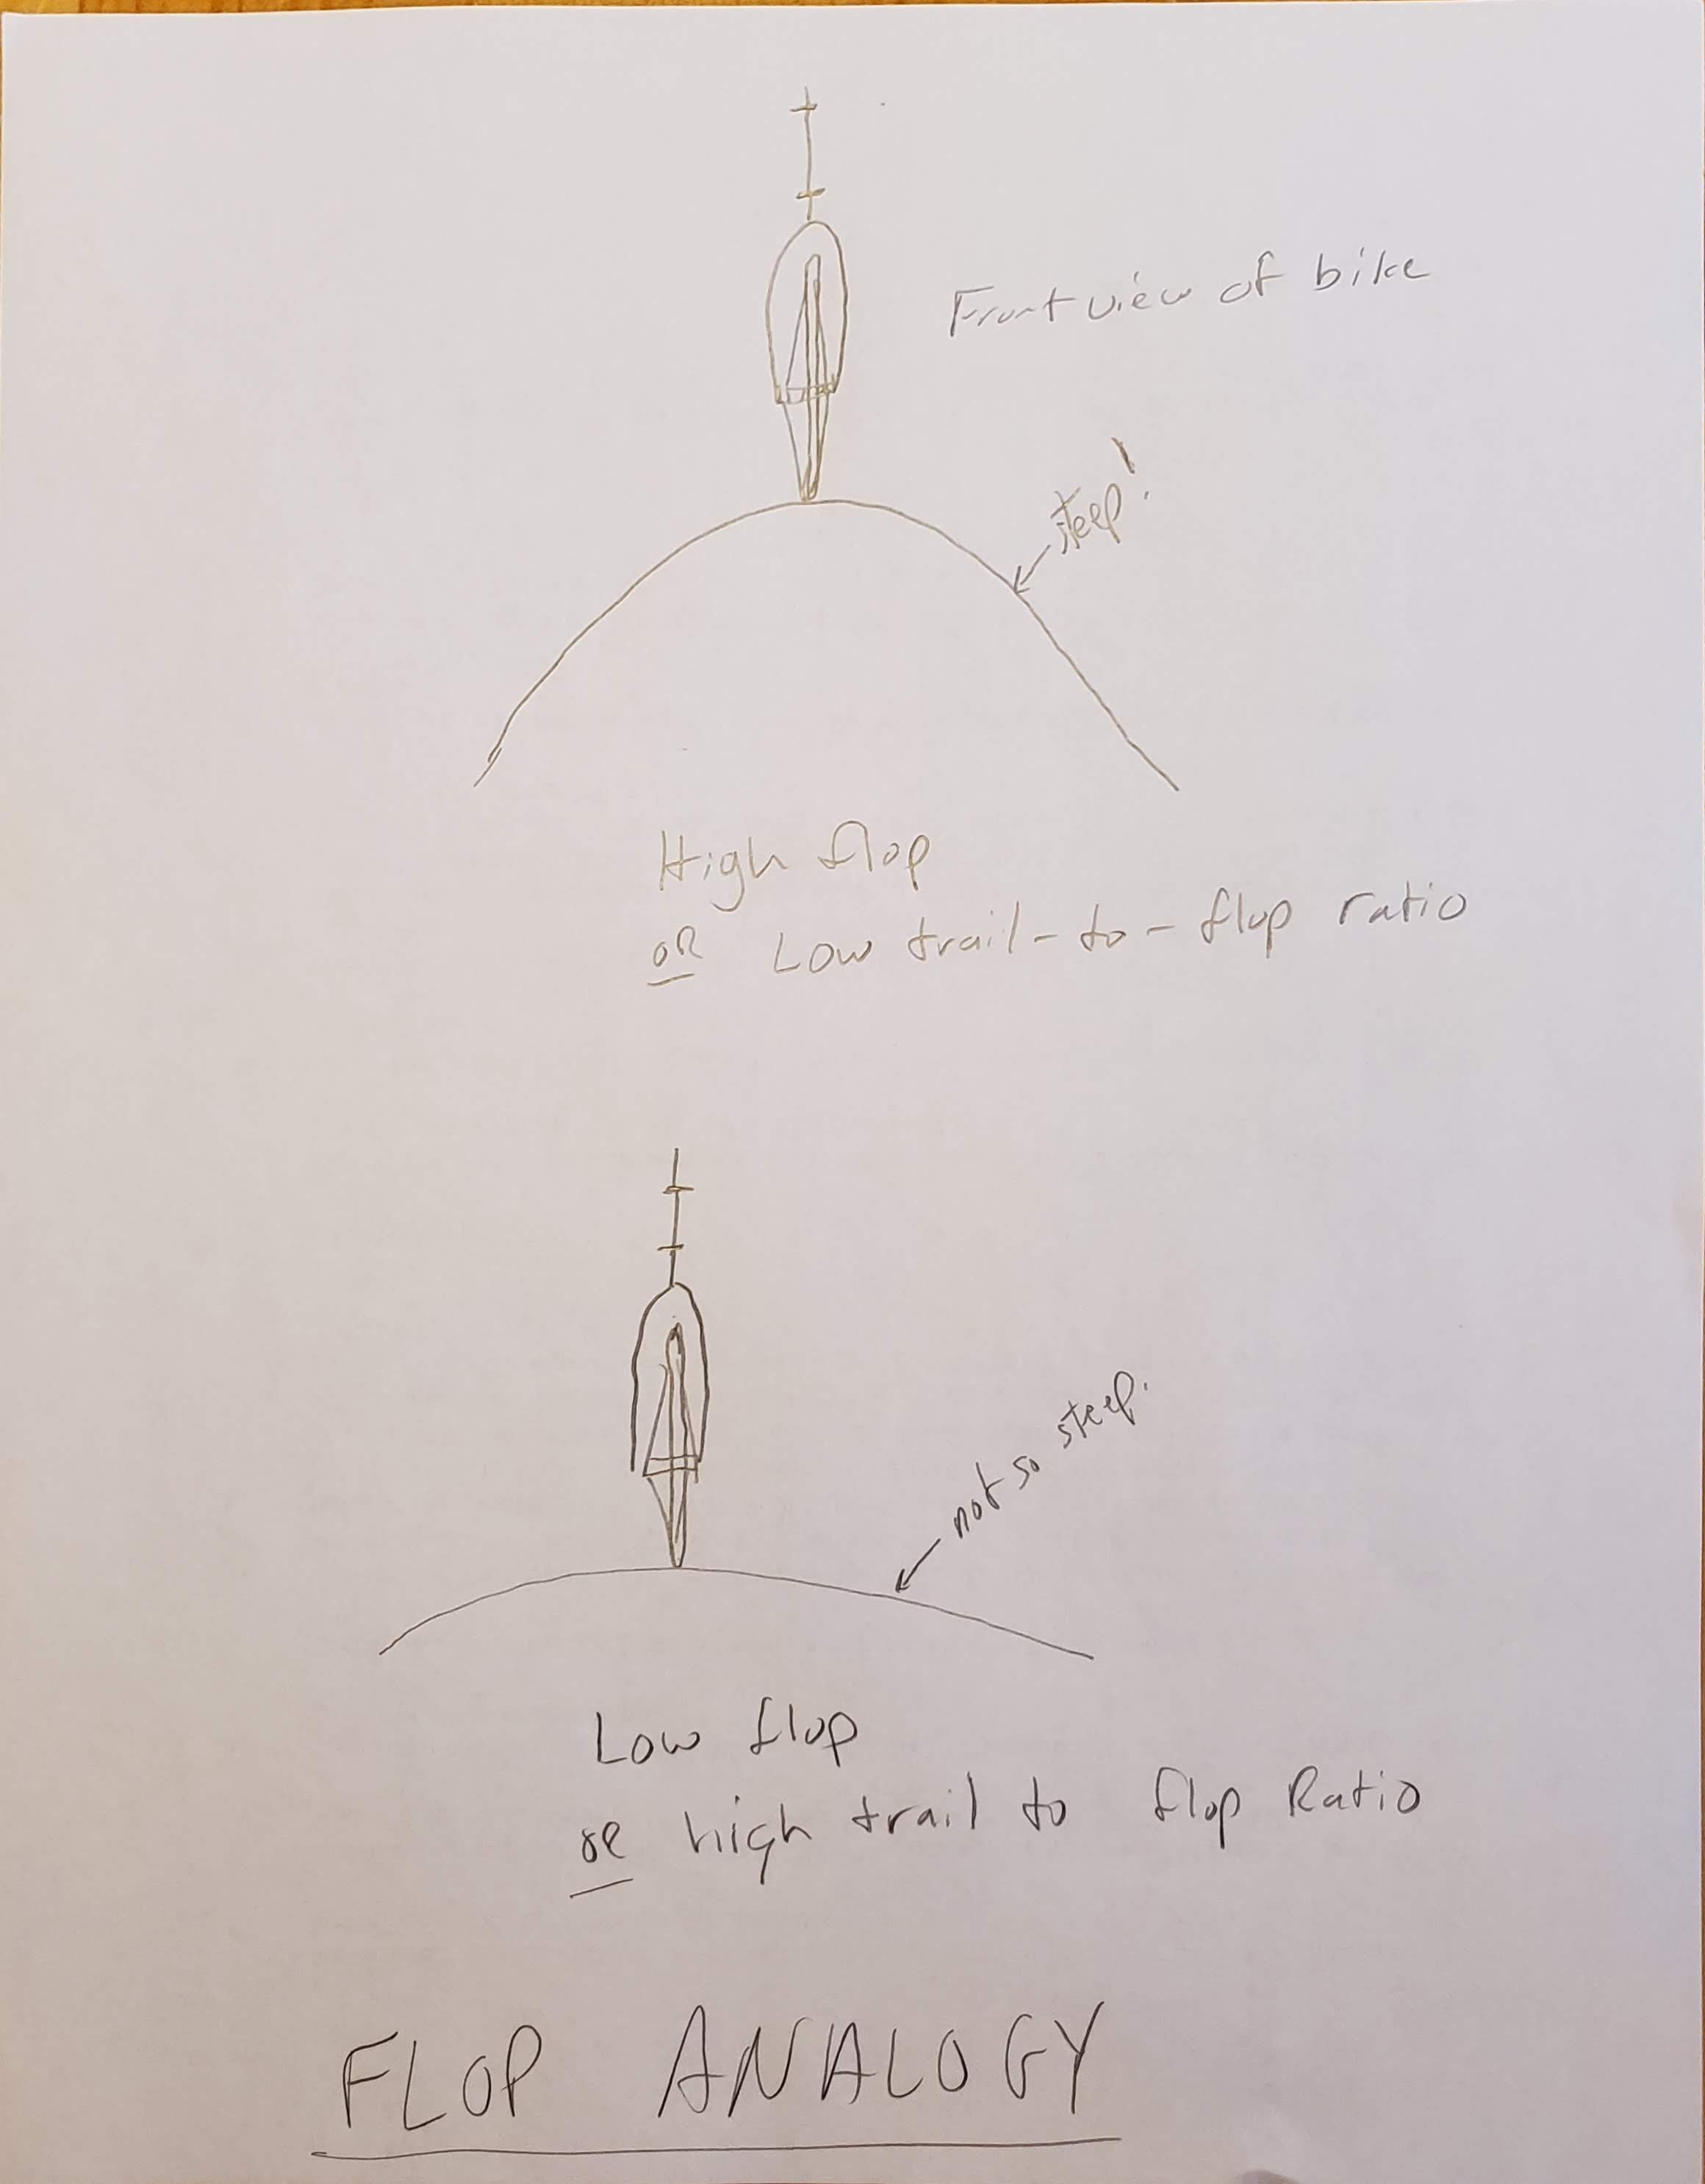
Riding a bike with lots of flop is riding on a knife edge. A little turn of the bars makes it feel like the bike is trying to take that little molehill nudge and turn it into a mountainous directional change. Gravity is working with flop to bring you down a hill, in a semi-literal sense. But what happened to our buddy trail – why didn’t he keep the bars from flopping way over just because we wanted to make a small steering correction?
The self centering force provided by trail increases with speed because the rolling resistance drag force is proportional to speed. Flop is an essentially constant force, that is independent of speed, because gravity is a constant. When speeds are decent, the self centering force provided by trail is high enough to win the battle over flop, and the bike feels stable. BUT, when speeds are low, the center force provided by trail gets weaker, and flop can win, encouraging over correction on the steering. Again, you’ll end up looking like the stereotypical bent rider zig-zagging all over the road.
But what if we find a way to have a reasonable amount of trail while minimizing flop? In that case, the meager trail force at low speeds is enough to keep you tracking straight up the hill. Is that possible? Heck yeah, it is.
To further your understanding of the interplay between trail and flop, try playing with numbers in this calculator: http://yojimg.net/bike/web_tools/trailcalc.php
For a given wheel and tire size, there are only two independent variables among the four remaining variables (the four we’ve been talking about – head tube angle, rake, trail, and flop). The head tube and and the rake themselves aren’t of any particular importance, in a sense. They, in and of themselves, don’t dictate how the bike will handle. What actually matters are the trail and flop figures. So a bike designer – if they have access to custom fabrication on forks in particular – should really start with a clean slate and choose a head tube angle and rake that provides the trail and flop they are looking for, while also working around other constraints in the overall design of the bike.
Since I commissioned the Zevo with a custom fork, I saw no reason to simply get what I thought would be best. I ended up with a very steep head tube angle of 85 degrees, and a fork with a negative rake of 40 mm, which is not a common figure in high clearance forks like I was seeking to use. This geometry gives me very low flop and a little higher than average trail.
To help understand the give and take among head tube angle, rake, trail, and flop, consider some examples – and use the calculator to check my work if you want:
Example No. 1: You will see that if you enter a 90 deg (vertical) head tube angle, it doesn’t matter what the rake is, you will have zero flop. And in this case, the trail will be equal to the rake multiplied by -1. In other words, a positive rake of 40 mm would give you a negative trail of 40 mm (bad!). A negative rake of 40 mm will give you a positive trail of 40 mm (good!).
Example No 2: If you have zero trail, you will also have zero flop, regardless of what the head tube angle is. Let’s assume a 700C wheel with a 28 mm tire. A head tube angle of 65 deg with a rake of 14 5mm gives zero trail and zero flop. A head tube angle of 45 deg and a rake of 242.5 mm has zero trail and zero flop. A head tube angle of 80 deg. and a rake of 60 mm has zero trail and zero flop. I could go on but you get the idea. Now, a bike would be very ride-able with zero flop, but it’s much less so with zero trail. You need at least a little bit of self centering – at least a little bit of positive trail.
Example No 3 (the most important one): You can achieve the same trail figure with different combos of head tube angle and rake, but the flops won’t be the same. Let’s assume a 700C wheel with a 28 mm tire. Let’s try a 72 deg. head tube angle and rake of 45 mm – this yields 64 mm of trail (a very average figure) and 19 mm of flop. This is a 3.36 trail to flop ratio. Now, let’s try a 77 deg head tube angle and 15 mm of rake. This gives you the same 64 mm of trail, but flop of only 14 mm, for a trail to flop ratio of 4.57. For a given speed, you have the same stabilizing force in both scenarios, but reduced destabilizing force in the steeper HTA / smaller rake option. The Musashi was like this, and I liked the low speed handling of that bike very much. Big Cat used a 76-77 head tube angle and a small rake fork.
The upshot of all of this is that the amount of flop you get for each mm of trail greatly increases as head tube angles get slacker (lower).
So this leads us to steep head tube angles to minimize flop. I am not entirely sure that we shouldn’t go Full Monty and to simply have a 90 deg. head tube angle and use whatever amount of negative rake is needed to get the desired trail number (along with zero flop, of course). The design of the Zevo started out this way, but I chickened out and reduced the head tube angle to 85, and with the negative 40 mm rake fork got me the trail figure I wanted, which was about 70 mm, and a very low flop of 6 mm. This is a whopping trail-to-flop ratio of 11.66. Compare these numbers to those typically used on short wheelbase recumbent bikes listed near the top of this discussion.
There was another reason to avoid 90 deg. head tube angle – that is that it pushed the head tube so far forward that it would force direct steering to have a negative stem extension (i.e. have it come back towards the rider). There is nothing wrong with this per se, but it would look bad to my eye, and it would increase the tiller dimension too. Even for a person who doesn’t care about the looks of a negative stem extension, there is a downside to having too much tiller. We’ll talk about tiller’s role another day. A head tube angle of 90 degrees also eliminates the stabilization / self centering offered by whatever weight the riders hands and arms exert on the end of the handlebars, although it’s true with the head tube angle only 5 degrees away from vertical, the Zevo design won’t have a lot of that phenomenon at work.
Also, what is the downside of trail? It IS possible to have too much of a good thing. We’ll save that for another time too.
Lastly, I’ve made flop out to be the enemy of good handling. I am not yet convinced that is actually ideal to eliminate it completely. It should help with turning – that is when you intend to turn the bike, you can let flop do some of the work of turning into the turn. Without some flop, will the bike feel too stable, and resistant to making turns? I am honestly not sure yet. The counter point is that flop is going to fight you when you want to turn the bars straight again. I am hedging my bets that any reluctance to turn at low speed is worth the clear upsides of straight line stability and ‘overshoot prevention’ in the specific context of recumbents.
Coming soon – trail, tiller, and how the Zevo actually rides.
PS: If you think I am full of crap, maybe this guy will have some credibility with you: https://youtu.be/AZrvLdX7B3E


Pingback: The Zevo Recumbent Bike | The Rothrock Cyrcle of Hell
Another important aspect of steering and handling is tiller. Read this: https://rothrockcyrcle.wordpress.com/2020/12/25/tiller-distance-effects-in-swb-recumbent-handling-and-design/
Another important difference between recumbents and uprights is that with uprights the arms and handlebars are used to support a significant part of the rider’s weight, so slower, heavier steering is the norm for upright bikes, as it means that the steering is not easily deflected by taking one hand of the bars for example, or when holding on tight to avoid losing control over a bump.
With a recumbent on the other hand, the rider’s weight is completely supported by the seat, so arms are for steering only, meaning more delicate steering inputs are possible, so steering can be lighter and more sensitive with less input required for direction changes without the risk of disrupting stability unintentionally.
I agree that the arms and torso of an upright rider add a lot to steering stability, and that recumbent riders don’t have that benefit, for the most part. My preference for open cockpit steering and almost straight arms comes from the fact that, of all of the recumbent steering types, that one seems to enjoy the most stability imparted by the rider’s arms and large muscle groups, as meager as it is.
Sorry if I didn’t express myself well, but I’m not suggesting that arms and torso add to the stability of an upright. Rather that because of the relatively uncontrolled mass of the torso on an upright (supported only by the riders seat and hands), more stable, heavier and so slower steering is needed to damp the relatively coarse rider steering inputs than for a recumbent, where the torso is much more fully supported, meaning that rider inputs can be more delicate, but only if the steering geometry is adapted for a recumbent for lighter steering (reduced trail). I’m talking about speeds above walking pace where major shifts in body weight are not required to maintain stability.
Most SWB recumbents have much higher trail than most upright road bikes, so I am not so sure. And the ‘delicate’ nature of steering inputs on recumbents is seen as a bad thing by most. Otherwise most bent riders wouldn’t struggle with steering overshoot at low speeds. The approach to steering geometry I have taken seeks to calm recumbent bike steering down by increasing trail and lowering flop, and my experience so far says that it works. There must be a reason why the relatively high flop geometry of upright road bikes doesn’t result in as much steering overshoot during use as similar geometry when used on recumbents does. I suspect it’s the stabilizing effect of the upright bike riders arms and core damping the flop forces.
Pingback: Climbing on a Recumbent, Part I | The Rothrock Cyrcle of Hell
Great inspiration, thanks. Russ
This is a magnificent explanation of flop and bicycle steering geometry. It really helps explain my experiences when I converted my M5 CHR into a mid racer. Thanks for this wonderful explanation.
This was a great explanation! I know I’m late to the game on reading it, but before getting the custom made fork, did you maybe simply reverse a ‘standard’ fork with a steeper steering angle as a proof of concept? I’m looking at my 20″ front wheel (with suspension) and it’s got an offset of about 51mm… doing the math (well the calculator) by reversing the fork (and obviously, rebuilding my steerer tube) I get to a 73/6 trail/flop ratio.
I know, nobody would ever suggest that, warranty void, not safe, etc (although the fork is way over-engineered for purpose…)
The whole frame, with it’s 85 steering angle, was built around the concept, so I was already in for a pound, so to speak. Actually, I did use a conventional fork turned around for a couple months initially as my custom fork originally came with a problem that had to be fixed by the builder. I think there is something wrong with your calls, as the only way a reversed fork that has 51mm of rake would produce only 73mm of trail is if the bike had negative trail to start with.
Calcs, not calls. Damn spell check.
Thanks! As for the calcs, it’s very possible something was wrong as the garage is dark, my space cramped, and aligning the lines was guess-worky
Don’t try to measure trail directly. Instead measure the head tube angle and the fork rake, the use a calculator. The to see what reversing the fork will do, just put a negative sign on the rake you enter into the calculator. Pretty much any bike that is designed with a typical head tube angle and a forward/positive rake of a typical amount (69 to 74 degrees, and 35 to 55 mm being the normal range, respectively), will have a very large amount of trail (and flop) if you reverse the fork. Basically, it’s a bad idea. To make reverse rake work, you need a steeper than typical head tube angle so that trail is still pretty normal.
Wait a minute… I think I see the miscommunication: my hypothetical involved rebuilding my steerer tube (meaning, the whole bike) to have an equivalent steerer angle as you identified – 85º – and then reversing an existing fork on the rebuilt bike. I wasn’t suggesting just flipping the fork on an existing bike, but more wondering whether the offset of a “standard” fork could be used on, say, a 2×4 lumber bike with an 85º headset angle (obviously, no drive train or even a proper seat)
I see. That all makes sense. I would say that so long as the disc brake tab is not simply bonded on, it’s likely ok. What you don’t want to do is to take a brake fixing part that is located on the back and is bonded, but is ok because brake forces aren’t trying to pull it off, the reverse the fork whereby now brake forces ARE now trying to remove it. Carbon disc forks, for example, are a bad choice for flipping around. I would say that 73mm is a good trail number for your 20″ (406?) wheel, especially if you are looking at tires in the 35mm or wider size range. If you were using skinnier, then a tiny bit more trail might not hurt. In that case you’d just take a degree or two off the HTA.
Gotcha! And thanks for the heads up on getting a properly designed reverse-rake fork. I was only thinking about testing, but if ever to implement, I would need a custom fork built. How’d you get that done?
Carver Bikes built the Zevo frame and fork.
I’m actually in the process of planning the rebuild of my short wheelbase bike now, as the noodle that is my boom just chews up all my leg power. While looking at other tweaks, I ran into this brilliant piece of analysis, so figured I’d test it out
Comment addressed to Tom Hovan – hope it reaches you
I designed and build a recumbent resembling a P38 only with revised fork geometry to limit flop, in keeping with your excellent article on rake/trail and flop. The bike was certainly stable once you were on the move but getting that second leg up to the pedal proved difficult. The bike meandered all over the place. I concluded I could not take it in traffic. I put it up for sale, then had second thoughts. I made a packer to raise the seat. This helped but the meandering on take-off was still a factor. Next I read your article on tiller distances and realised immediately that my tiller distances were far to great. I revised the steering geometry to reduce the tiller distance, returned the seat to the original height and hey presto a stable bike at take-off. I took the bike out for a 40 mile ride, some on main road. The bike climbs well , is stable in the climb even at low speed and is very fast on the flat.So, thankyou for the articles.
Bob,
Thanks for the message. Glad to hear that the info was of some help, after all.
Coming up with a good bike design is a little like baking a cake. There is more than one recipe that will make a good cake, more than one kind of cake, and more than one ingredient that needs to be ‘right’ to make a good cake. I wish it was more straightforward than that, but it just doesn’t seem to be. So coming up with something that you like, and seems to be an improvement over the status quo is a major victory!
Tom, delighted to make contact